 Stainless Steel & High Tensile Steel Bolts & Quality Parts |
Home About Technical & FAQ How To Buy & Contact Terms & Conditions of Sale Links |
|


Product Catalogues
VW Split Screen Van
VW Bay Window Van
VW Beetle
VW Type 3
VW Thing / Trekker
VW Karmann-Ghia
VW Engines T1+T4
VW Electrical
IGNITION SYSTEMS
TOOLS
Product Catalogues
Air Cooled Porsche
Rover V8 Parts
Ford Kits
BMC Era Car Parts
Land Rover Kits
Standard "Factory" Installation
|
In Order To Better Understand The Factory Issued Wiring Standard We Simply Have To Lift The Bonnet And Take A Look.  As Can Be Seen, Volkswagen Used Plain Brass Un-Insulated Slide-On Female Terminals With A Two-Crimp Design (Known As An "F-Crimp"). |
Replacement Parts Available To The Car Owner / Restorer
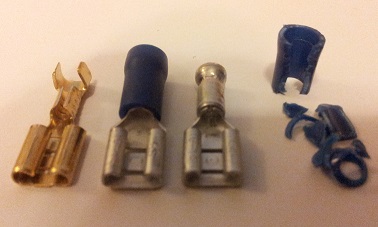
Volksbolts DO Supply These - And The Correct Tool To Crimp Them.!! These Connectors Are Of Original Equipment Specification As Per Factory Fitment By Volkswagen, Porsche And The Old BMC Manufacturers; You Should Replace Like-For-Like To Maintain Original Factory Fitted Looks And Quality. Note #2 : The Plastic (Squashy-On) Collared Connectors Are Widely Available Via High Street Motor Stores And Some Supermarkets. You Can Crimp Them Into Place With An Equally Cheap Tool Or A Pair Of Pliars If Availble. They Offer Good Short Term Utility To Get You Home In An Emergency ; The Single Crimp Design Does Not Offer The Same Strain-Relief On The Wire As The F-Crimps Two Crimp Design - Leaving The Wire Prone To Stripping And Pulling Out Of The Connector In The Long Term. The Coloured Plastic Collar Also Stands Out As Being Of A Non-Genuine Fitment, Which Is Undesirable For Higher Class Quality Classic Cars. Note #3 : Select The Correct Sized Connector For The Wire(s) Being Crimped Into Them. 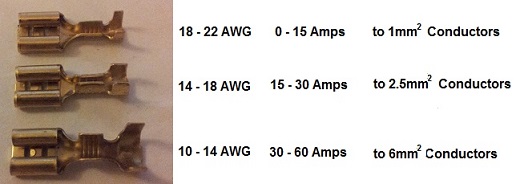 |
Crimp Demonstration Using The Genuine F-Crimp Terminal
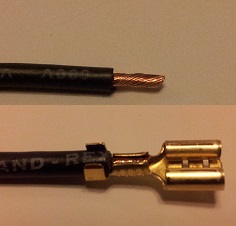 Trim The End Of The Wire Square. Then Strip A Short Length Of Insulation Off The Copper Conductor, Also Keeping The Insulation Trimmed Square. The Rear Crimp Should Align With The Insulation On The Copper Wire. The Bare Copper Wire Should Protrude Into The Forward Crimp But Not Protrude Through It Into The Terminal End Of The Connector. It Should All Be Neatly Contained Inside The Limits Of The Barrel Of The Crimp. 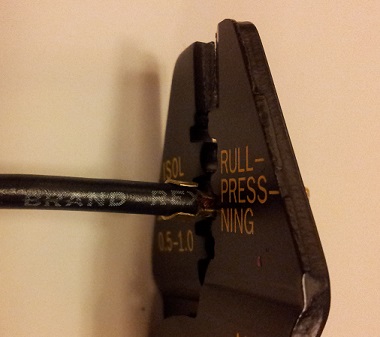 Select The Appropriate Crimping Jaws On The CORRECT Style Of Tool And Crimp The Conductor Crimp To Tightness. Note #4 : With The Elpress Hobby Tool You Will Need To Work The Tool Along The Length Of The Crimp Barrel To Ensure ALL Of The Length Of The Crimp Barrel Is Crimped Into Place 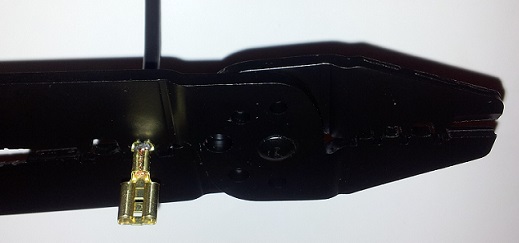 Select The Appropriate Crimping Jaws On The CORRECT Style Of Tool And Crimp The Insulation Crimp To Tightness. |
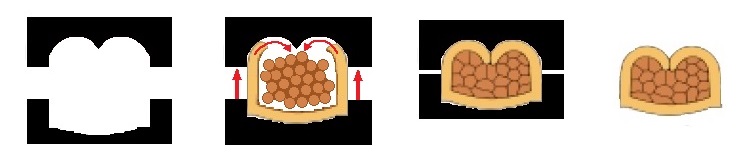 As Can Be Seen In The Above Graphic, The F-Crimp Crimping Tool Has Jaws That Are Designed To Curl The Brass Crimp Tangs Of The Connector Around On Themselves Such That They Fold Into The Wire Being Crimped. A Good Crimp Will Fold The Tangs Over And Compress Into The Strands Of The Copper Wire Such That They Are Equally Deformed To Best Eliminate Voids In-Between The Individual Strands. The Brass Tangs Should Fold Around And Butt Lightly Against Each Other. The Connector Itself Should Be In Good Condition After The Crimping Operation; Not Being Bent, Twisted, Cracked Or Showing Excessive Flash From The Press Operation Of The Crimping Tool. Note #5 : If Two (2) Wires Are Being Crimped Into The Same Terminal, Then The Wire With The Smallest Outer Diamter Should Be Place At The Bottom. Note #6 : The Insulation Crimp Can Close Up As Per The Above Diagram - Though The Insulation Material Should NOT Be Pierced. It Is Acceptable To Use An Overlap Crimp In This Location - Where One Tang Overlaps On Top Of The Other. |
Crimping Demonstration Of Plastic Collared Connectors
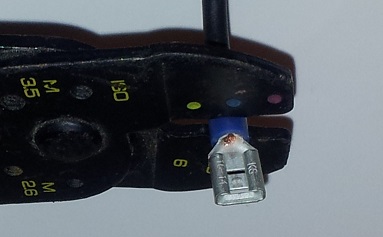 Crimping Of The More Commonly Available Plastic Collared Connectors Is To The Most Part A Repeat Of The Above. The Crimp Tools Should Have A Marker On The Jaws Indicitative Of Which Size Of Connector They Crimp. Yellow Plastic Colars Will Be Crimped By The Tool Jaw With The Yellow Dot. Red Collar Connectoprs You Use The Red Dot. Blue Collar Connectors You Use The Blue (As In The Picture Above) 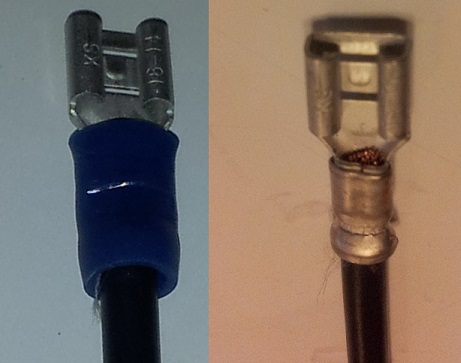 You Should Be Able To Achieve A Result As Above. Sadly, To Properly Inspect The Crimp Quality Onto The Copper Conductor You Have To Strip The Plastic Shield Out Of The Way. As Can Be Seen, The Crimp Barrel Of The Connector Squashes And Deforms. The Collapse Mechanism Is More Of A Crush Than A Skillful Folding Of Metal Via Cleverly Shaped Jaws. This Leaves Some Voids In Place Inside The Crimp Which May Allow The Connector To Work Loose Over Time When Done Well, As Above, The Crimp Can Hold A Good Degree Of Strain - A Simple 'Pull-Out' Test After Crimping Should Be Enough To Determine Whether The Crimp Barrel Has Been Crushed Tightly Enough Onto The Copper Wire. This Simple Test Is No Substitute For The Thorough Visual Inspection That Can Be Achieved On A Genuine "F Crimp" Connector. |